I like to set aside time on Sunday to be a "book farmer". I try to keep up with the information that comes to me in the books we've collected, the magazines and news letters that come in the mail and the blogs I read for insight and inspiration. Sunday is also the day people here go visiting. I've just set down my reading to put a stick of wood on the fire. And now I'm ready to enjoy a long overdue visit with you.
Have you seen this?
I first read Anne and Eric Nordell's artilce, "Weed the Soil not the Crop" in the Summer, 2006 issue of Small Farmer's Journal (a similar article with the same title, written by the couple, is currently available at: Acres USA).
I started experimenting with their ideas as best I could using my tools and know how (both of which are limited) back in Spring 2007. I was just re-reading that article today and refreshing myself on their approach.
I can say that the parts of this method that we incorporated as directed worked well for us. And I was reminded that we aren't finished mixing these ideas into our work. I've been wondering how to begin writing our farm plan for 2011. This is a great place to start.
You Can Build These Stackable Drying Racks!
Many of the things we harvest in Fall need to be dried before they can be properly stored. Space for drying beer hops or seed corn or baking beans or wild rose hips is at a premium in our house. Could you use some extra space to dry herbs or your own garden produce too? Well, maybe winter might be a good time for you to try (and improve) this project made with hand tools and regular dimensional lumber.
I borrowed several good ideas to make this design work. In particular, I liked the idea of making a rack size that would fit into an oven. They can easily be stacked over or near an air vent too, making double use of your heating or cooling system.
24"x16" Stackable Drying Rack - Materials Per Tray:
2 24" 1x2 for frame
 2 14-1/2" 1x2 for frame
4 4-1/2" right triangles (I used 1/2" plywood) as corner braces
4 5" 1x2 for legs
4 2-1/2" 1x2 rack spacers for legs
8 box nails (screws would be good too)
16 shingle nails (or screws)
Staples for fastening screen to frame (I used a staple gun - tacks could work too)
24" x 16" plastic window screen
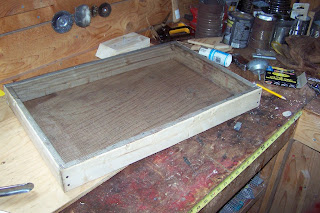
I started by pre-cutting enough pieces for several trays. Then, using a flat surface and a square I drilled pilot holes and then hammered in two nails in each corner.
After squaring the frame again, I used a blade to cut the 4' screen down to 24" by 16". Since 24" is half of four feet, I could use the nice factory cuts on either edge of the screen. Then I stapled it to the frame.
To give the tray frame strength and help secure the corners, I used the triangle shapes mounted over the screen and nailed them directly to the frame with shingle nails.
I fastened a rack spacer in the exact center of each leg, then mount the legs right tight up to the frame. This is what makes the trays stackable, so be careful how you measure. To make all the legs lineup in the stack I built the first one and then eye-balled all the others to match it. I'm no finish carpenter. This was my attempt to create a simple and inexpensive design that serves a useful purpose. These racks do create a large amount drying area in a small space. And they do look nice enough for Susan to allow them in the kitchen!
Notes and Suggestions
You may want to choose a more natural material than window screen. And be aware that stapled plastic screen will not support the weight of a curious cat plus whatever it is that you are drying!
The bottoms can be strengthened by trussing them with wire, fishing line, string...whatever material you
are comfortable with. A cover might be a good idea too
So Long 'till Next Time!
Thank you for stopping in to visit. I hope we'll be getting together again soon.


